Top Open Source Alternatives to Tonic AI for Data Anonymization and Synthetic Data
Top Open Source Alternatives to Tonic AI for Data Anonymization and Synthetic Data
March 31st, 2025

AWS RDS is a relational database service from AWS that is easy to set up and scale. It's used by thousands of companies across the world.
In this guide, we're going to walk through how you can anonymize sensitive data in your RDS database with synthetic data for testing and rapid development using Neosync. Neosync is an open source synthetic data orchestration company that can create anonymized or synthetic data and sync it across all of your rds environments for better security, privacy and development.
If you haven't already done so, follow the Seeding your RDS DB with Synthetic Data log to get set up.
Let's jump in.
We're going to need an AWS account and a Neosync account. If you don't already have those, we can get those here:
Now that we have our accounts, we can get this ball rolling. First, let's log into our AWS console and create a new RDS instance. For this guide, we're going to create a PostgreSQL database and select basic options that will suffice for a Dev DB. If you're creating a production database, you'll likely want to optimize your RDS instance for better memory, security and Storage.
For our RDS instance, we're going to create a PostgreSQL database. Here are my configurations:
Everything else you can leave as the default. Click "Create Database" to create your database.
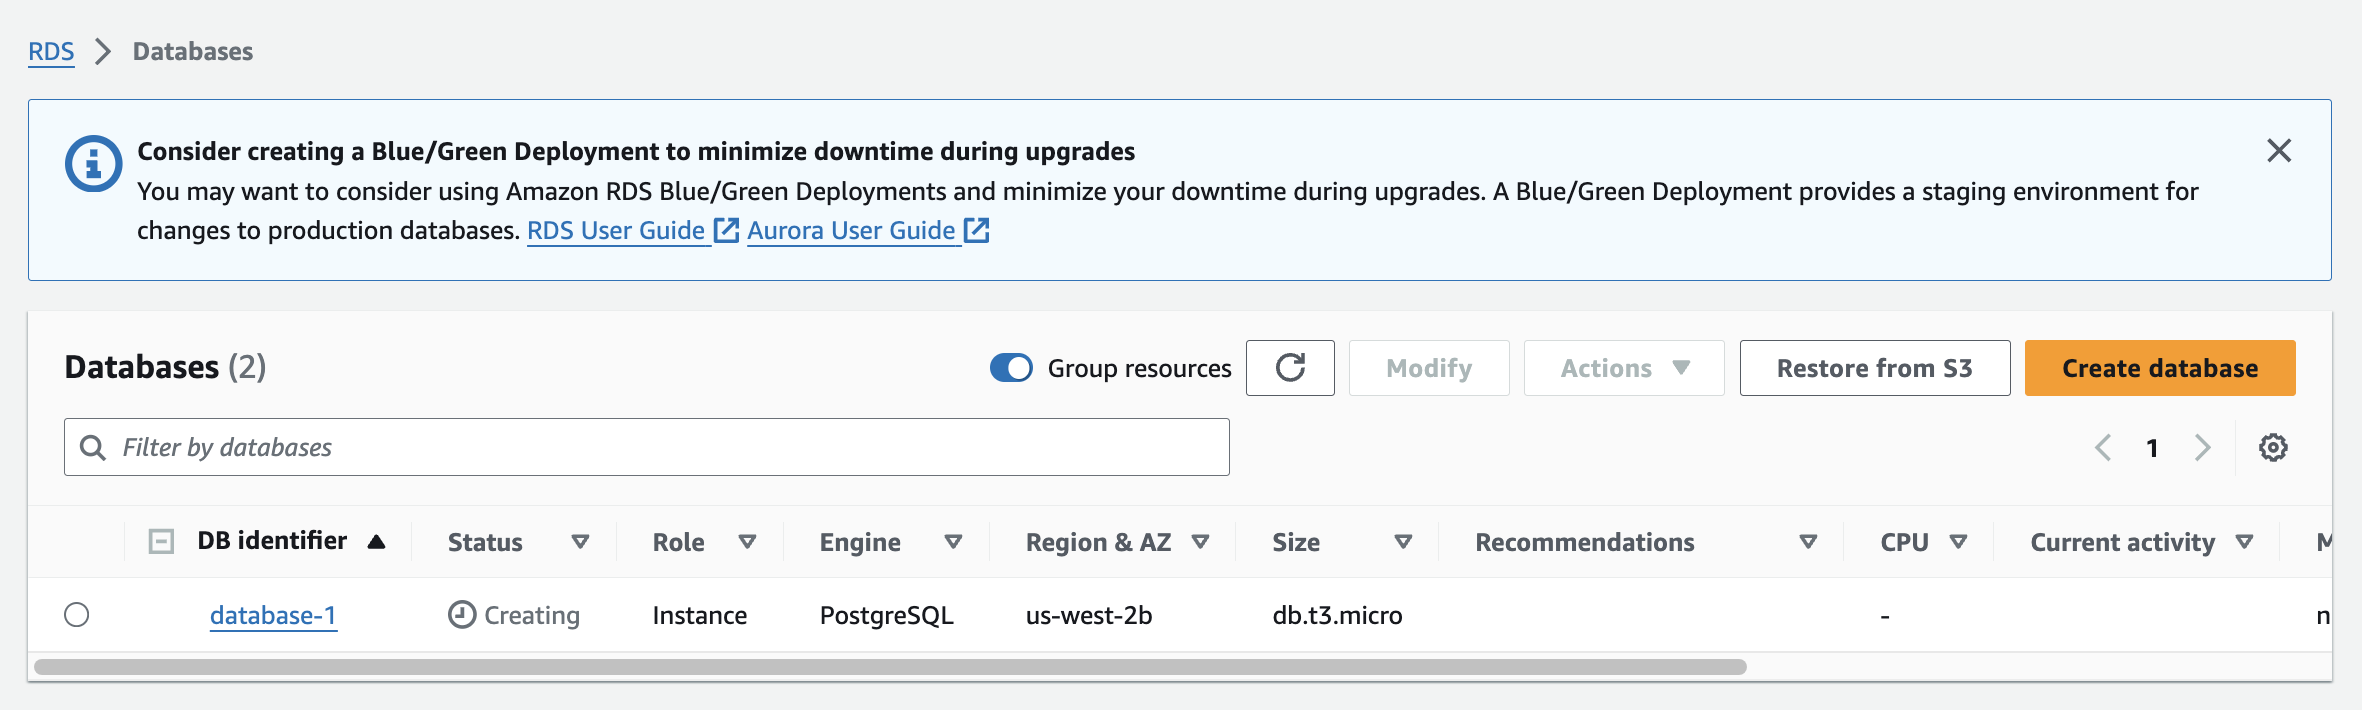
As this database instance is being created, we can create another instance in the exact same way to serve as our destination database.
So now we have two databases: a source and a destination. I already have data in my source database but if you don't you follow our Seeding your RDS DB with Synthetic Data blog to seed your database with data.
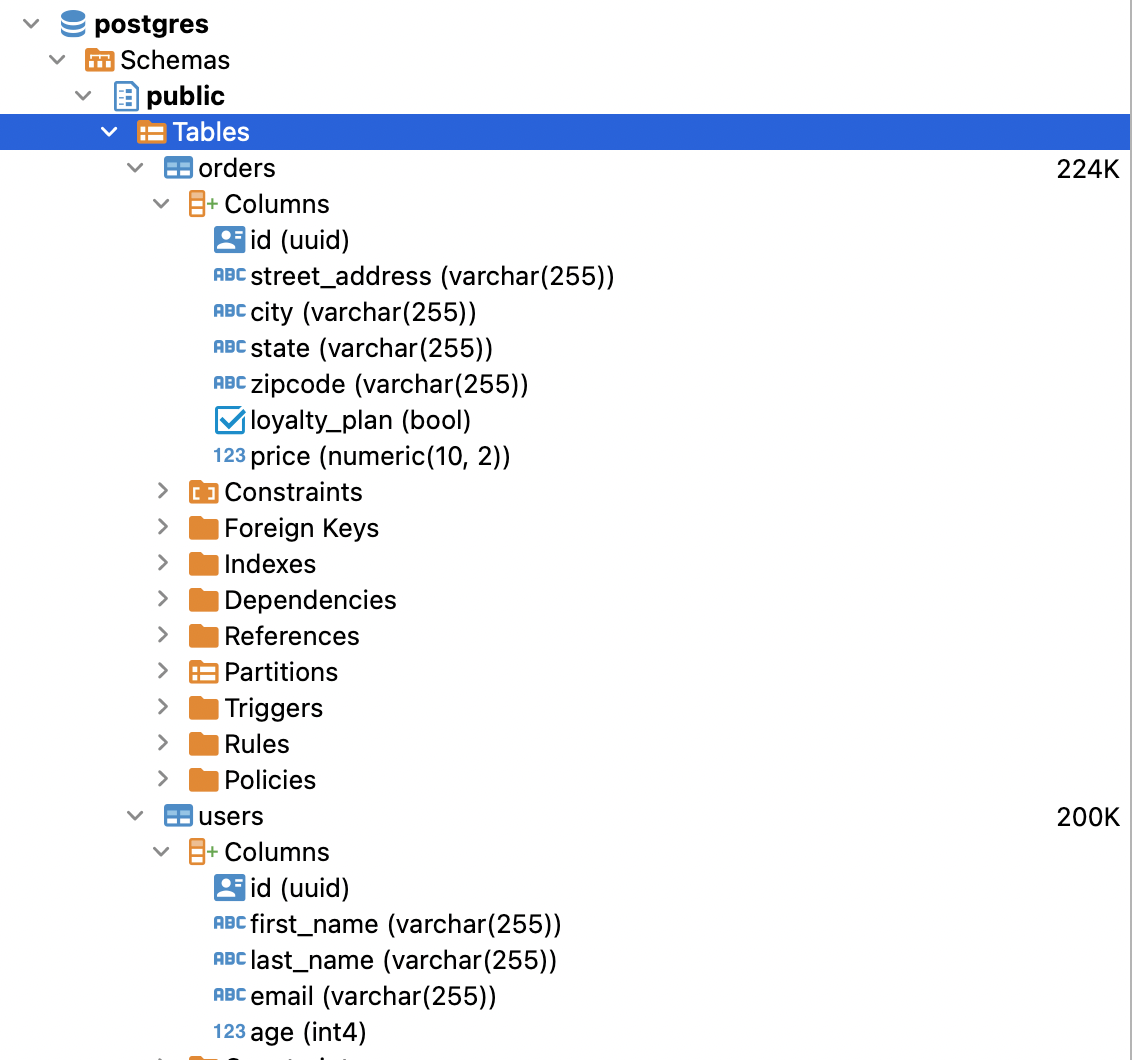
Next, we'll need to define our destination database schema.
Now let's create our schema. Here is the SQL script I ran to create our tables in the public schema. If you have the uuid() extension installed you can also set the id column to auto-generate those for you or you can use Neosync to generate them. I'll use Neosync to generate them.
CREATE TABLE public.users (
    id UUID PRIMARY KEY,
    first_name VARCHAR(255) NOT NULL,
    last_name VARCHAR(255) NOT NULL,
    email VARCHAR(255) NOT NULL,
    age INTEGER NOT NULL
);

CREATE TABLE public.orders (
    id UUID PRIMARY KEY,
    street_address VARCHAR(255) NOT NULL,
    city VARCHAR(255) NOT NULL,
    state VARCHAR(255) NOT NULL,
    zipcode VARCHAR(255) NOT NULL,
    loyalty_plan BOOLEAN NOT NULL,
    price DECIMAL(10, 2)
);
We can do a quick sanity check by going to Tables and seeing that our tables were successfully created in both databases.
Nice!
Nice! Easy enough to get started.
Now that we're in Neosync, we'll want to first create connections to our RDS databases and then create a job to sync data. Let's get started.
Navigate over to Neosync and login. Once you're logged in, go to to Connections -> New Connection then click on Postgres.
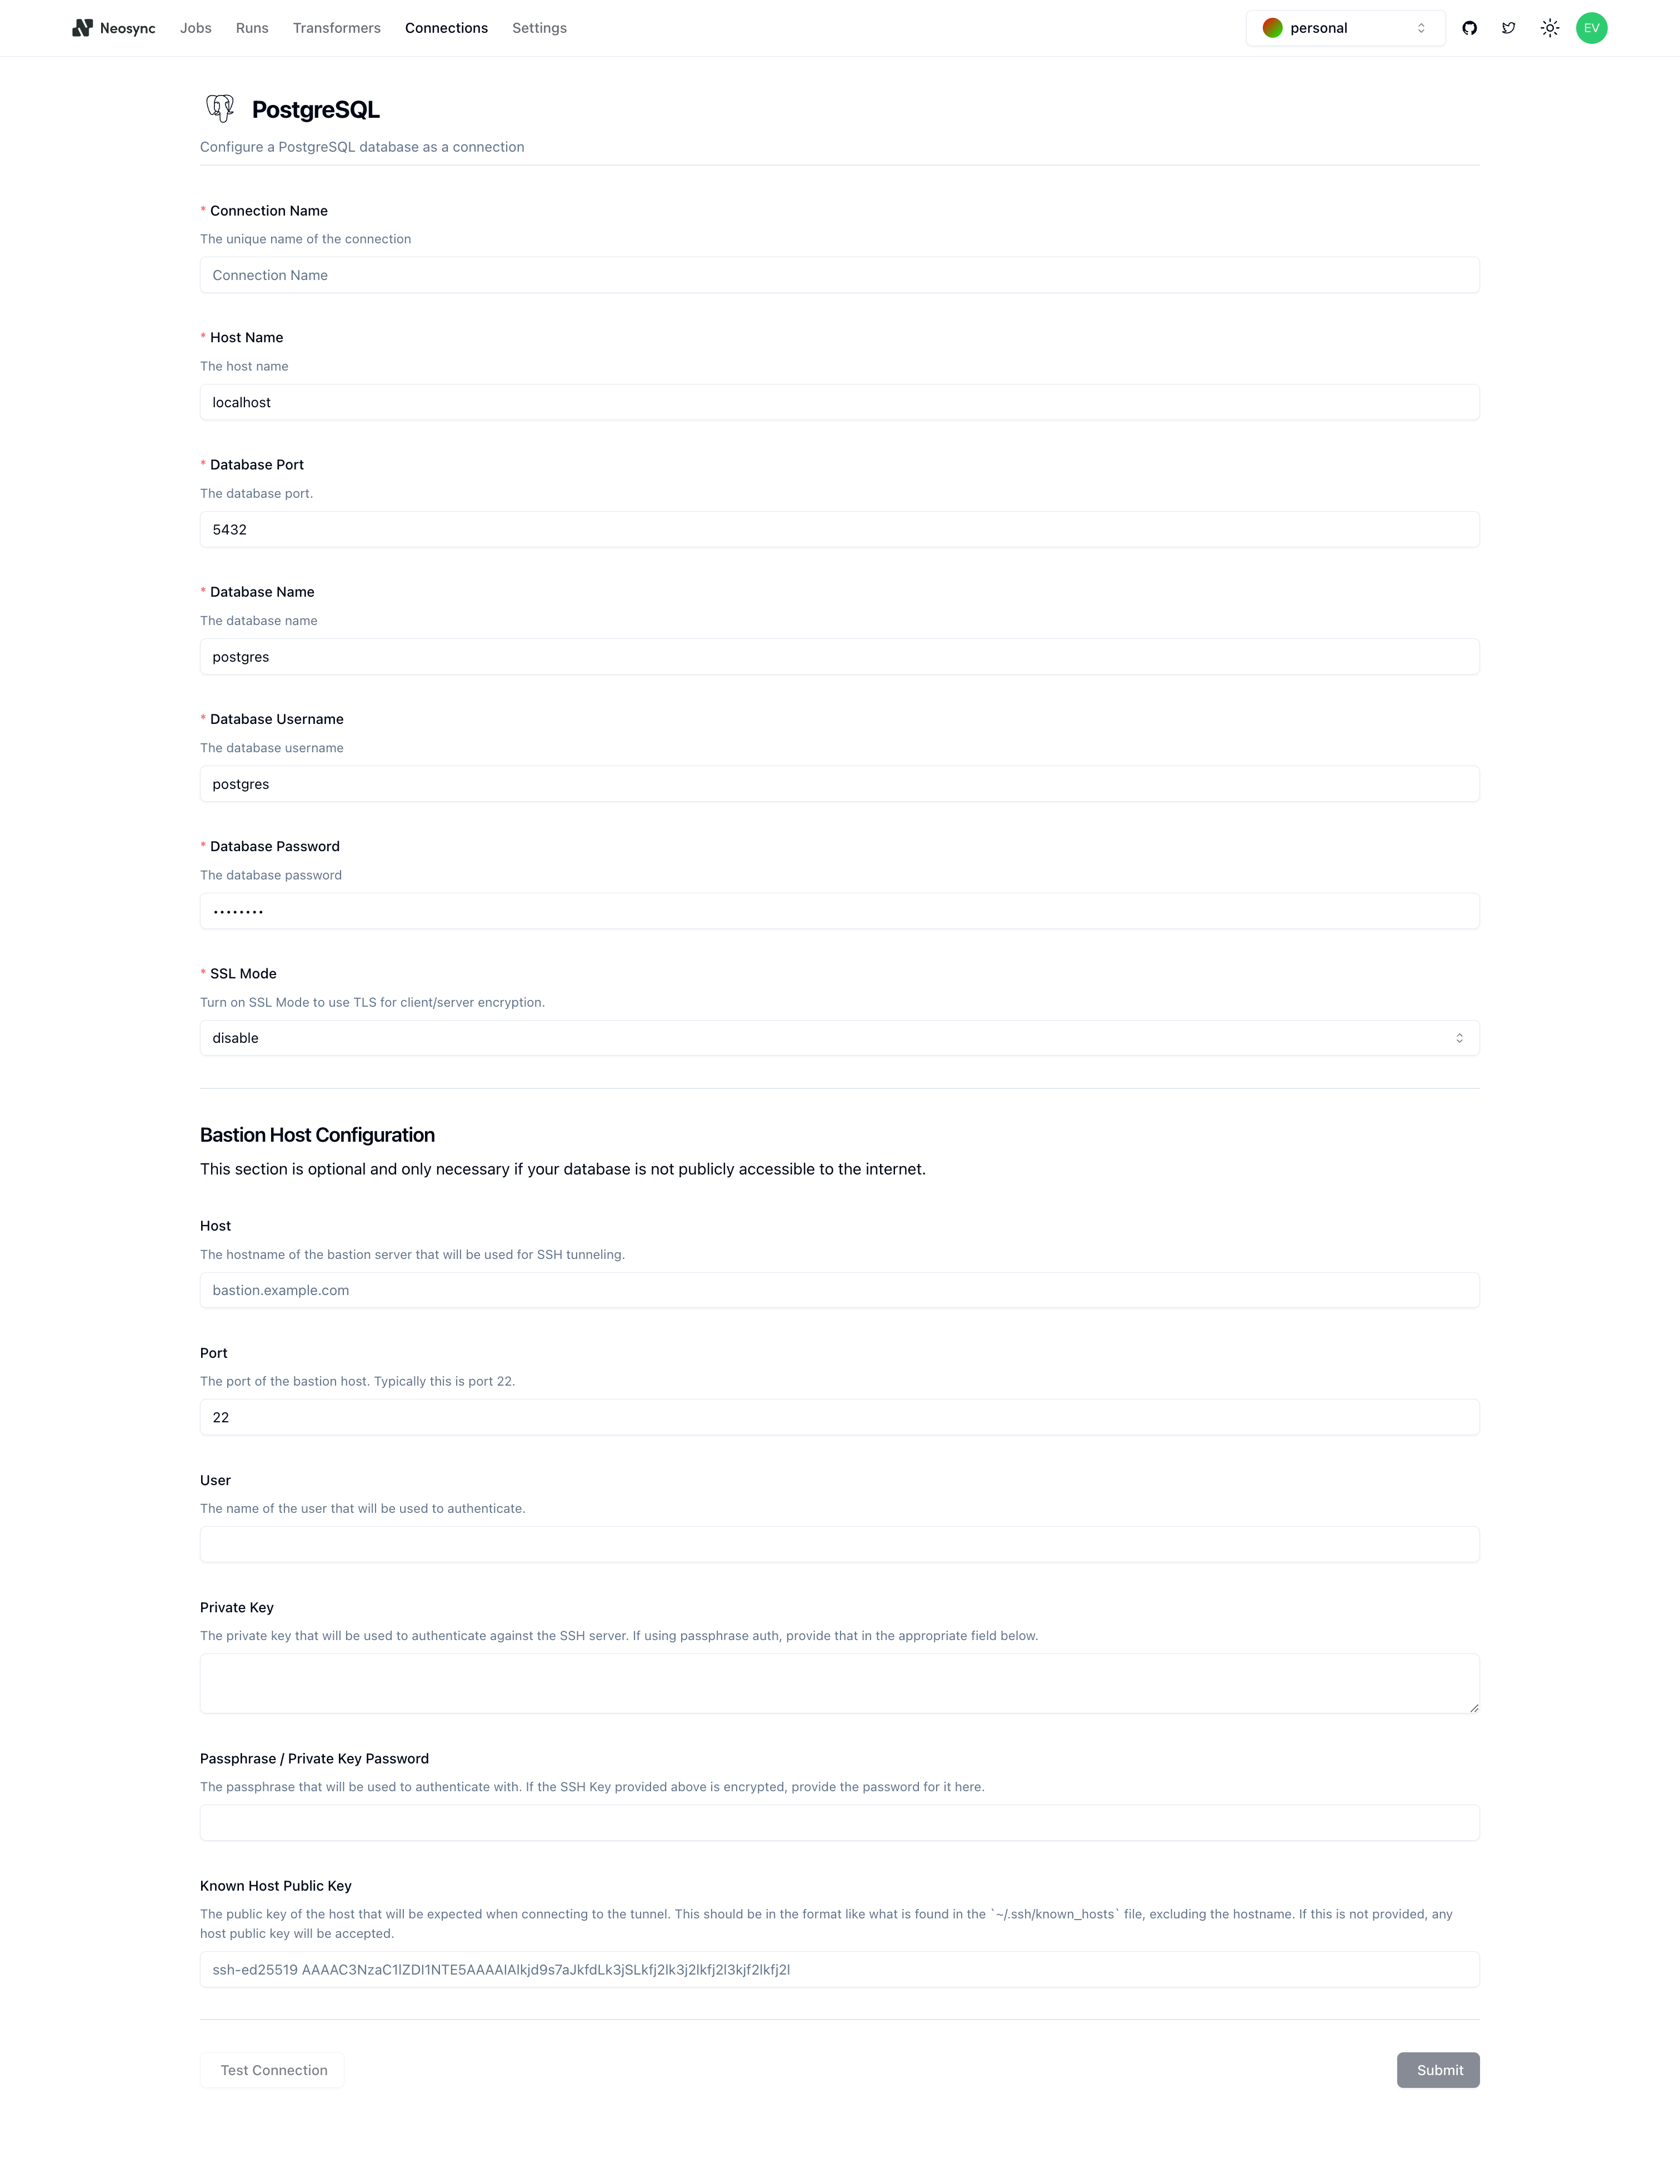
You should see the above form. Since our RDS database is public we can ignore the bottom part about configuring a Bastion Host. Let's go ahead and start to fill out our RDS connection string in this form. Here's a handy guide of how to break up the connection string and map it to the fields in the form.
You can find your host in the AWS console by clicking on the Connectivity & Security tab and copying the string under Endpoint.
| Component | Value | Description |
|---|---|---|
| Protocol | postgresql:// | Indicates a connection to a PostgreSQL database. |
| Username | evis | The username for authenticating the connection. |
| Password | ************ | The password for authentication (hidden for security). |
| Host | database-1.xxxxxx.us-west-2.rds.amazonaws.com | The hostname or IP address of the database server. |
| Name | neosync-test | The specific database name to connect to. |
| SSL Mode | sslmode=require | Specifies that SSL encryption is required for the connection. |
Once you've completed filling out the form, you can click on Test Connection to test that you're connected. You should see this if it passes:

Let's click Submit and repeat this for our database so that we have two connections: one for aws-source and one for aws-dest.
In order to generate data, we need to create a Job in Neosync. Let's click on Job and then click on New Job. We're now presented with two options:
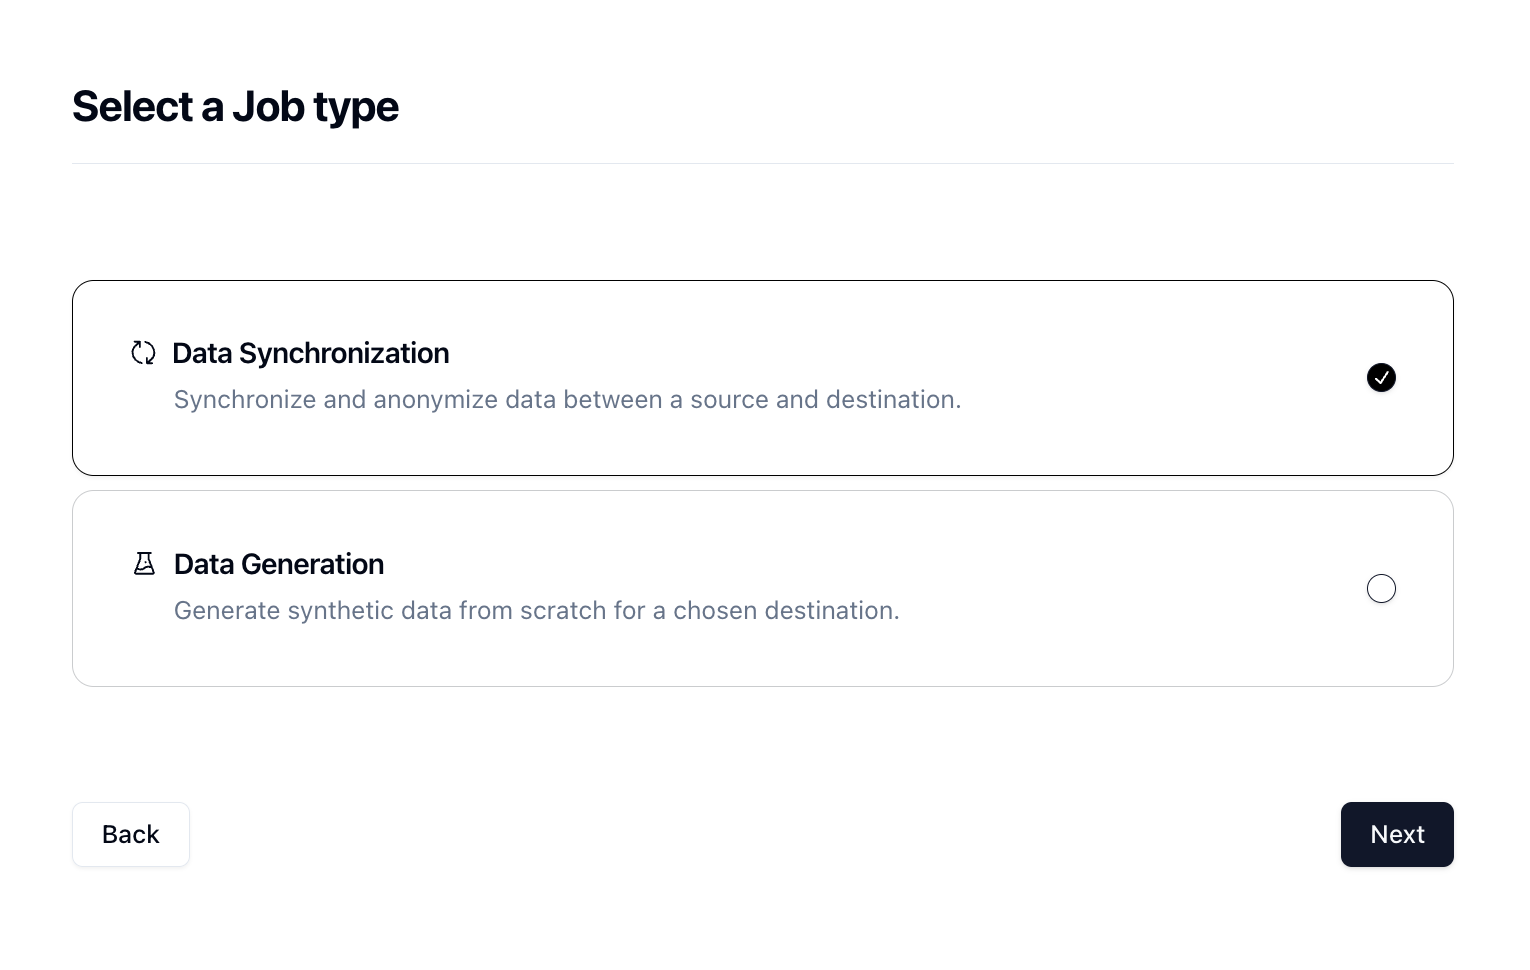
Since we're anonymizing existing data, we can select the Data Synchronization job and click Next.
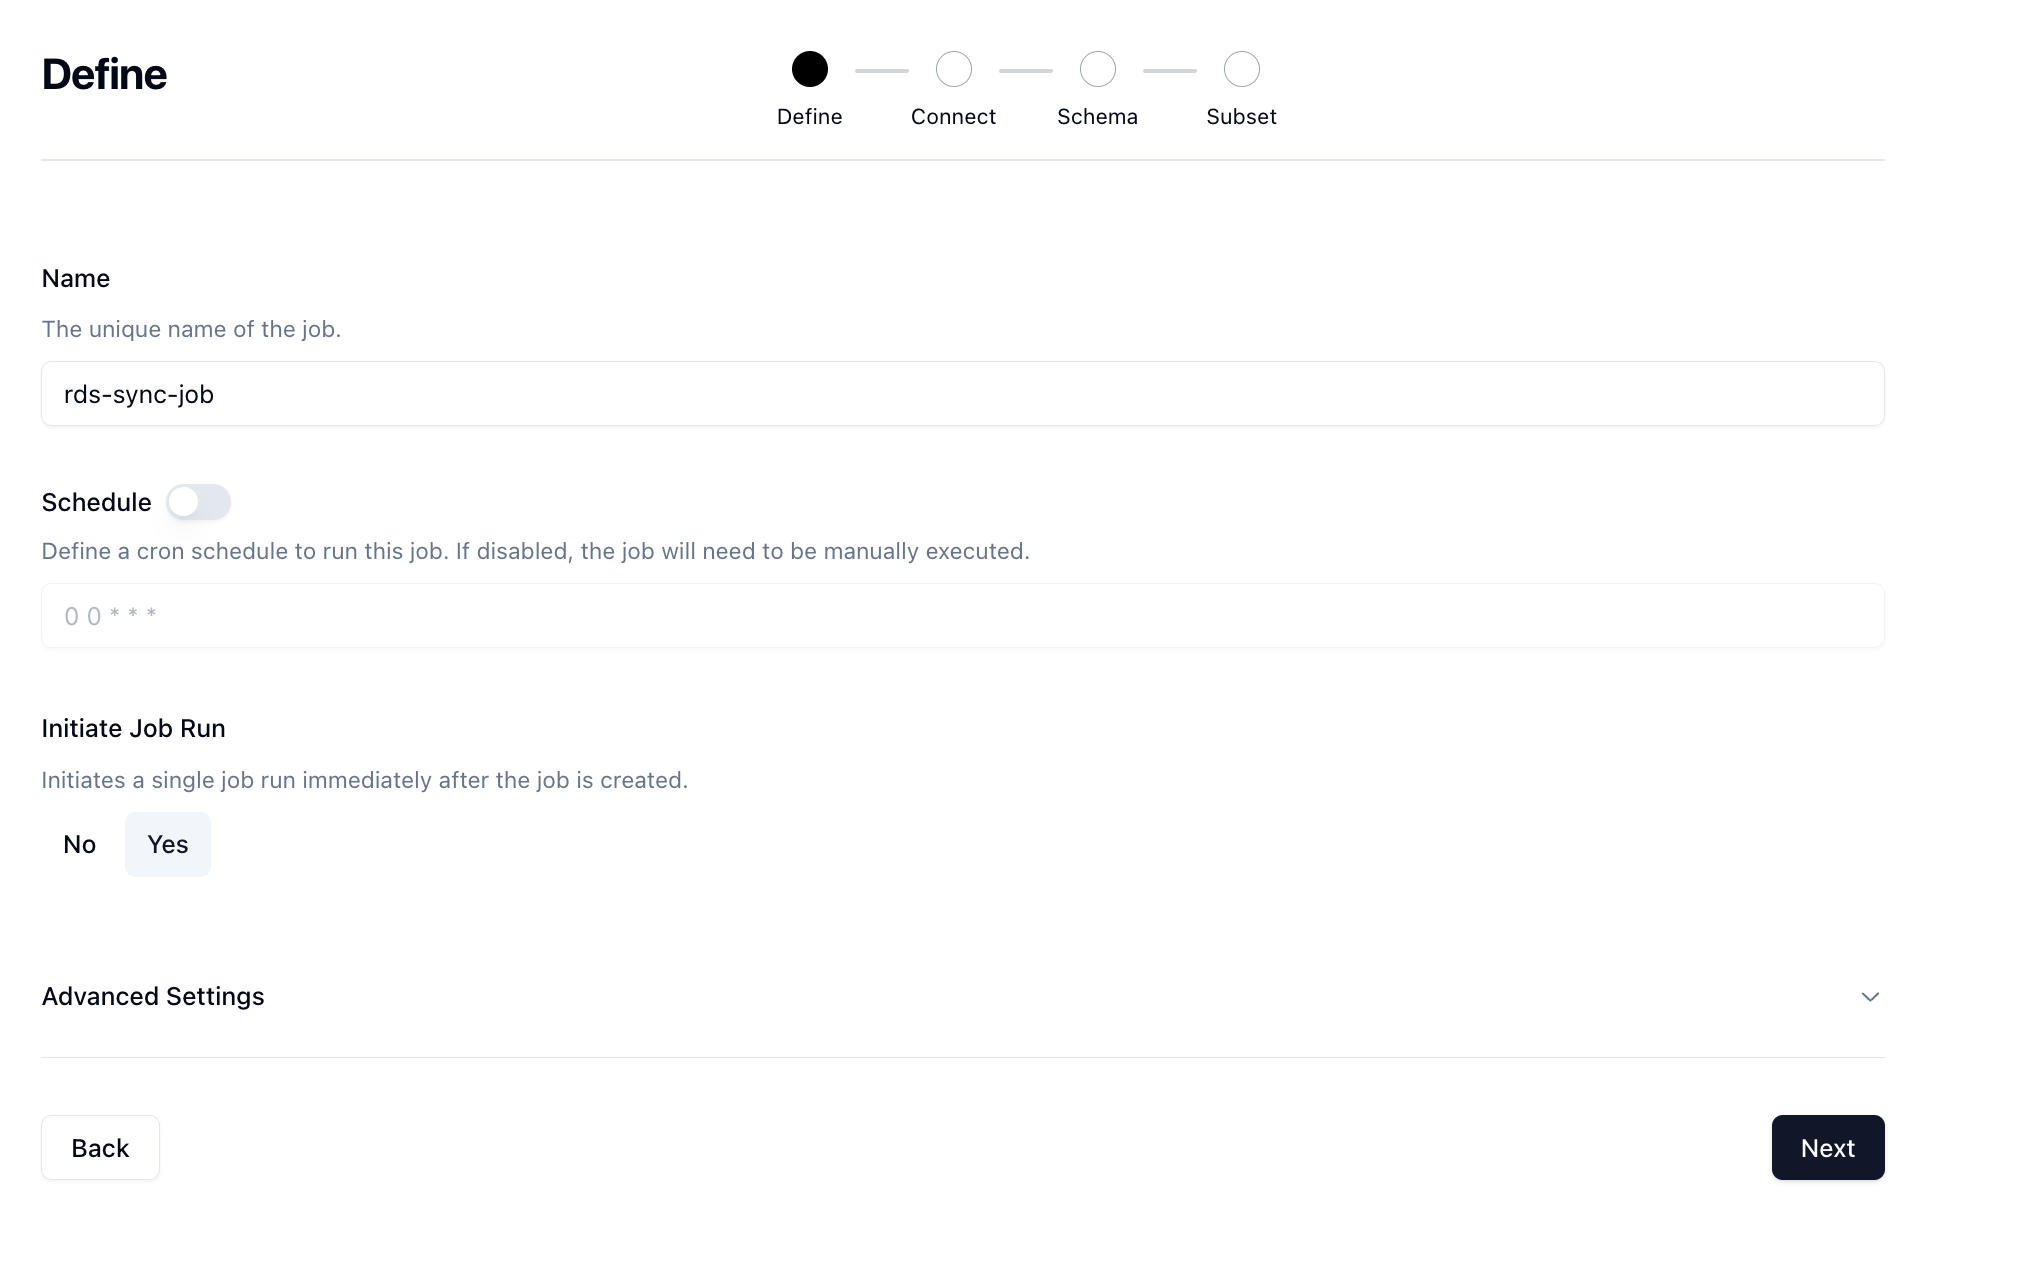
Let's give our job a name and then set Initiate Job Run to Yes. We can leave the schedule and advanced options alone for now.
Click Next to move onto the Connect page. Here we want to select our source and destination connections that we configured earlier.
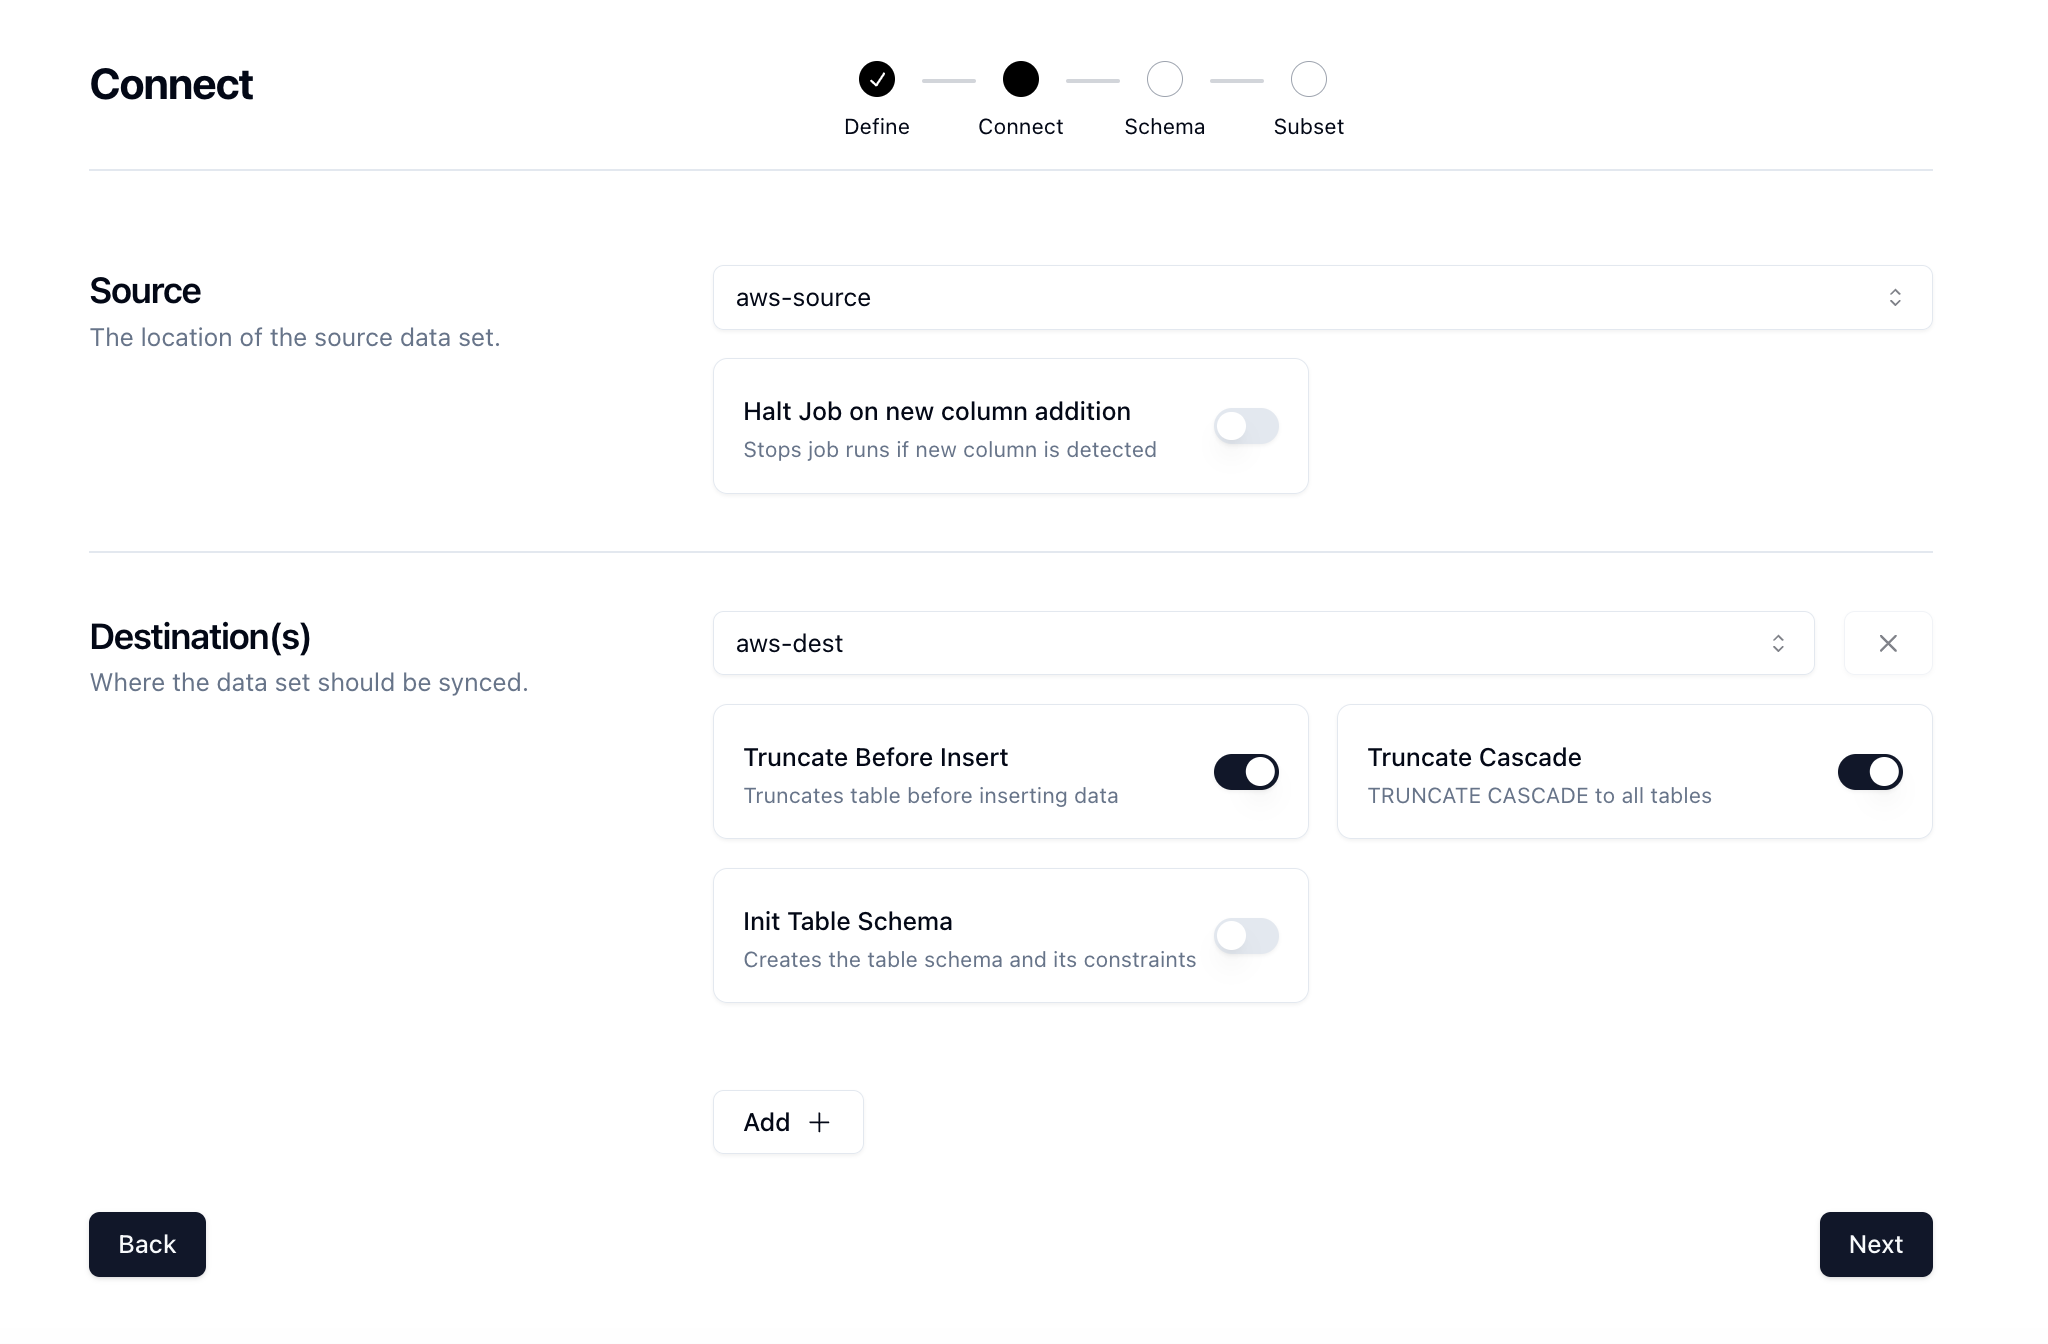
There are some other options here that can be useful. We'll also select the TRUNCATE CASCADE option which will truncate our table and cascade to all constraints so that we get a fresh set of data every time. Click Next.
Now for the fun part. We need to determine what kind of anonymization we want to do and/or what type of synthetic data we want to create and map that to our schema. Neosync has Transformers which are ways of creating synthetic data. Click on the Transformer and then select the right Transformer that maps to the right column.
Here is what I have set up for the users table.
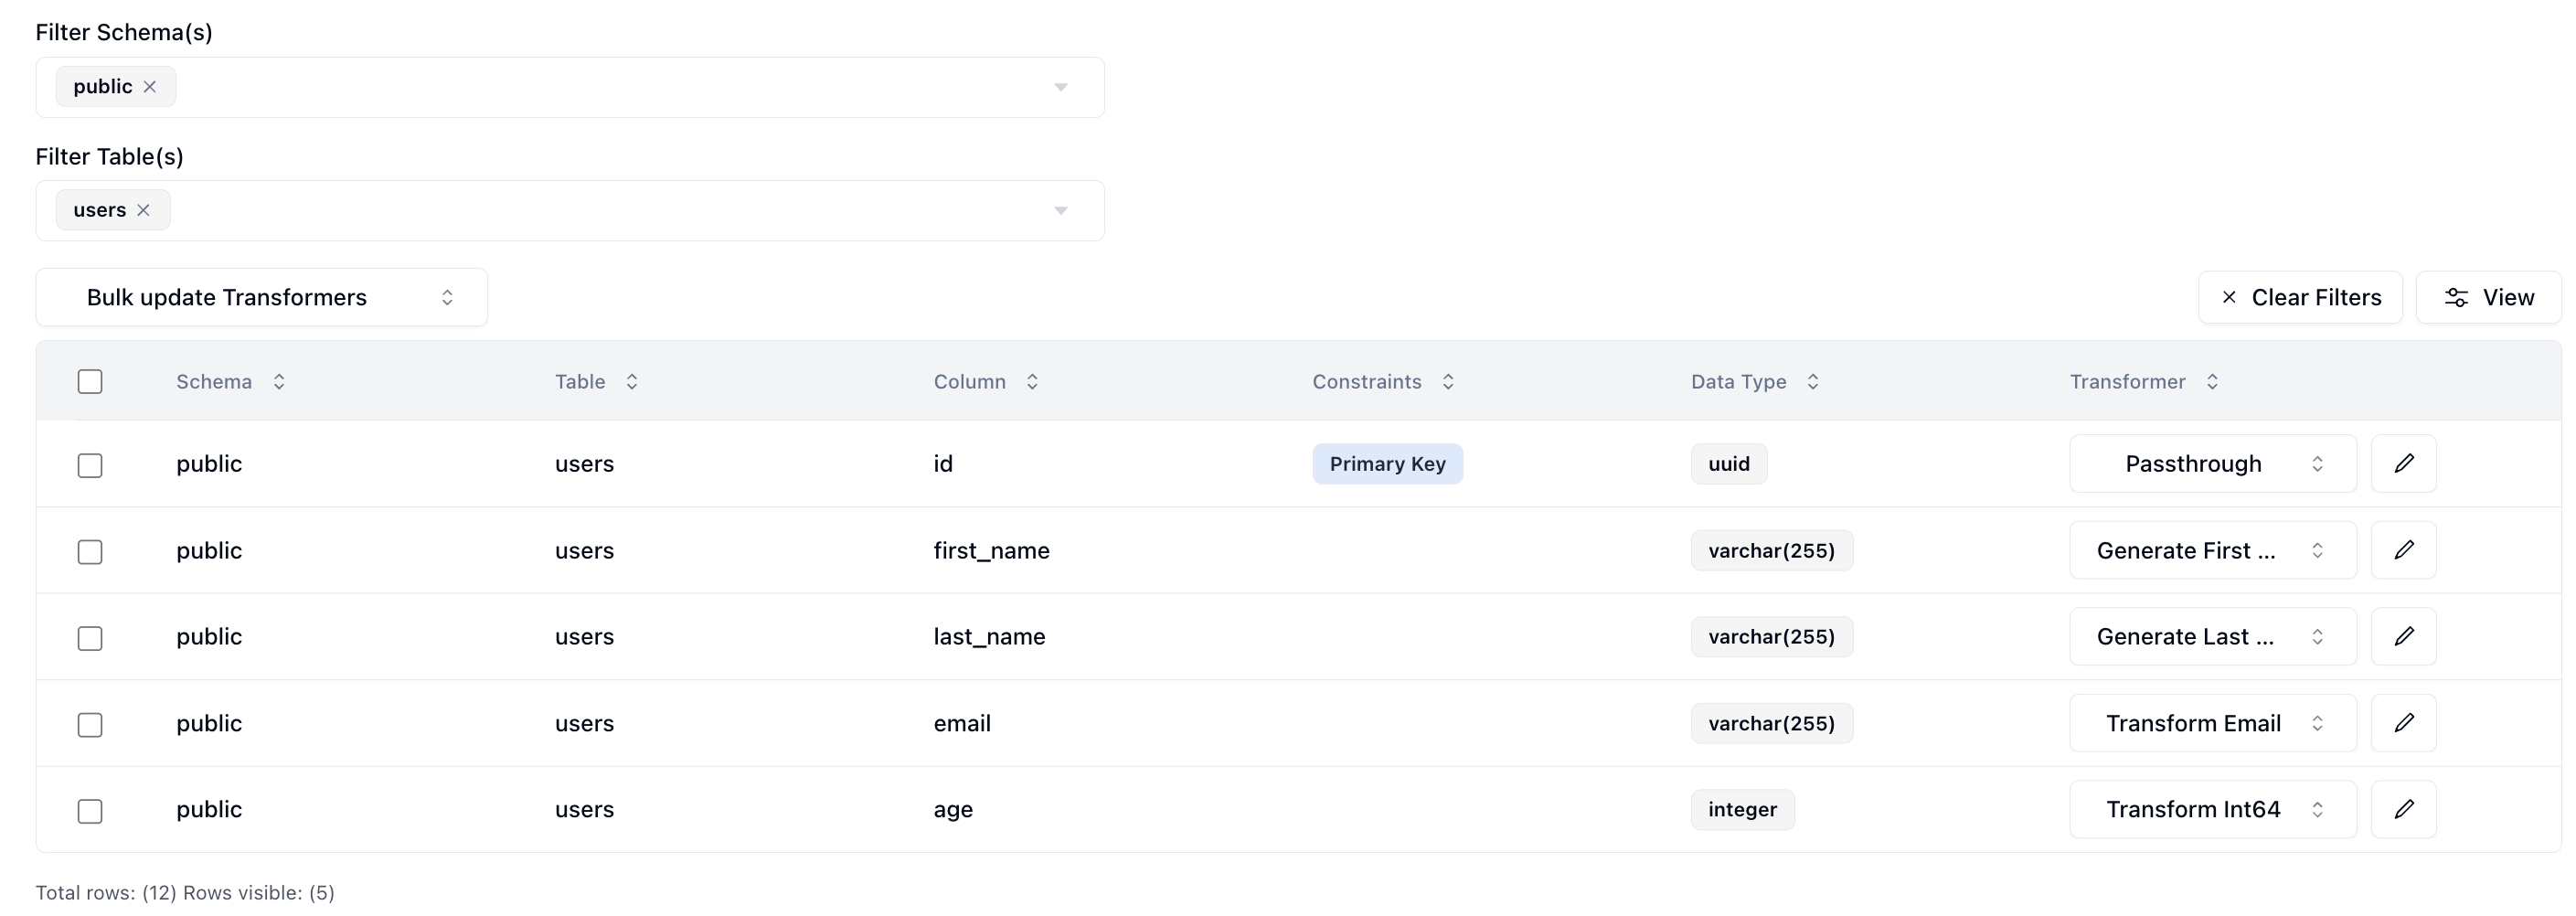
I've set the id column to passthrough which will allow us to validate our output data. The first_name column to generate a brand new first name, the last_name column to generate a new last name, the email column to transform the existing email address by generating a new username and preserving the domain, and lastly the age column to transform it by anonymizing the current value.
And for the orders table.
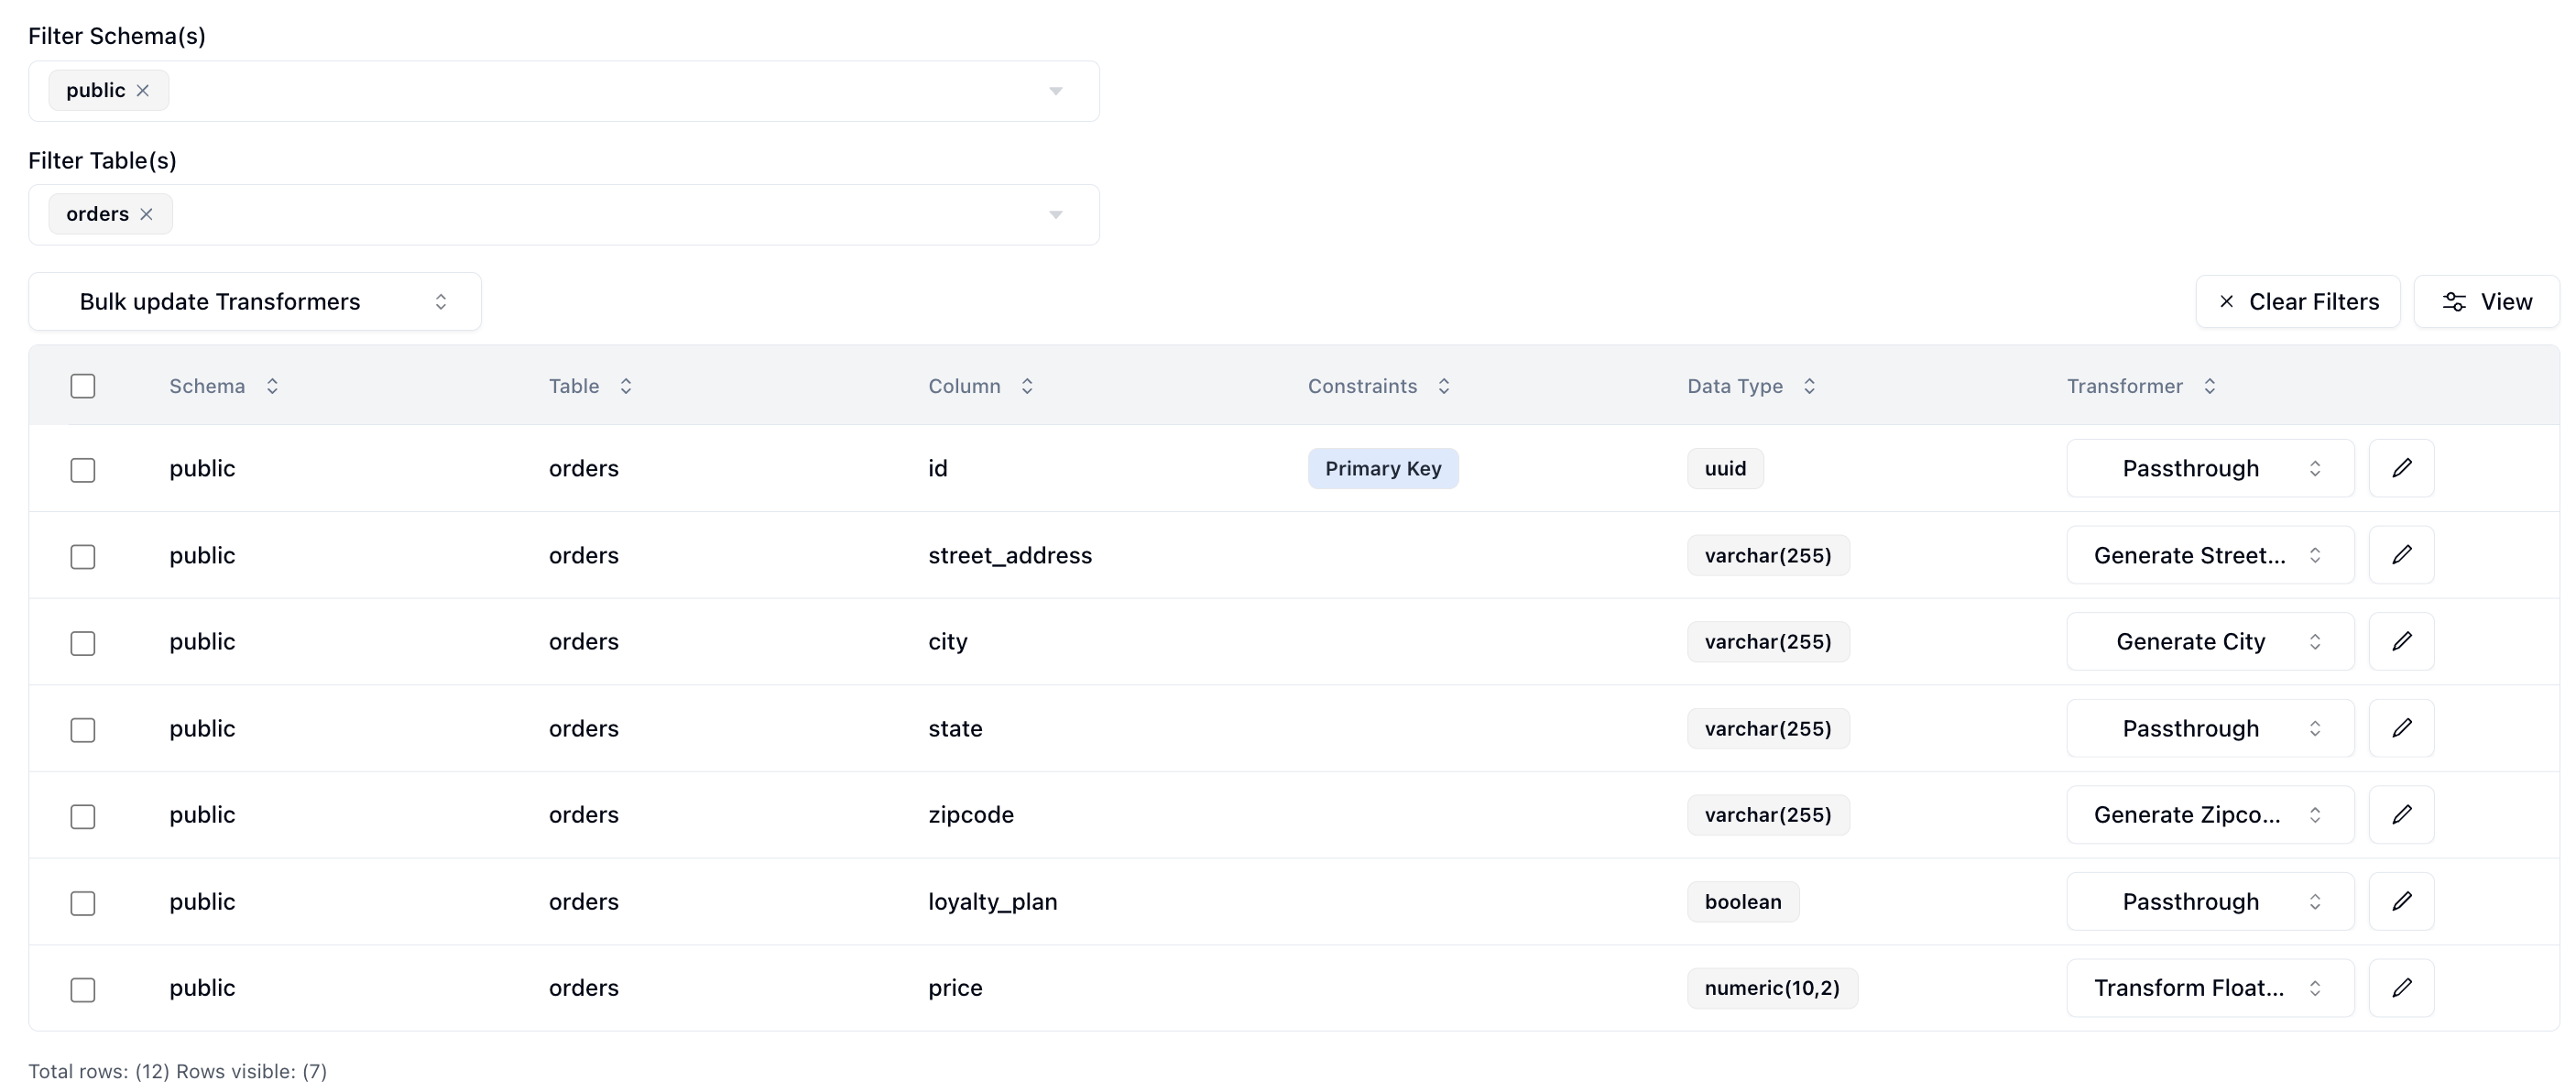
I've set the id column to passthrough which will allow us to validate our output data. The street_address column to generate a brand new street address, the city column to generate a new city, the state column to passthrough the current value, the zipcode column to generate a new zipcode, the loyalty_plan to passthrough the current value and lastly the price column to anonymize the price of the order.
Now that we've configured everything, we can click on Next to go to the Subset page. We don't have to subset our data but if we did we can enter in a SQL filter to subset our data. Neosync will take care of the rest.
Now let's click Save to create our job and kick off our first run! We'll get routed to the Job page and see something like this:
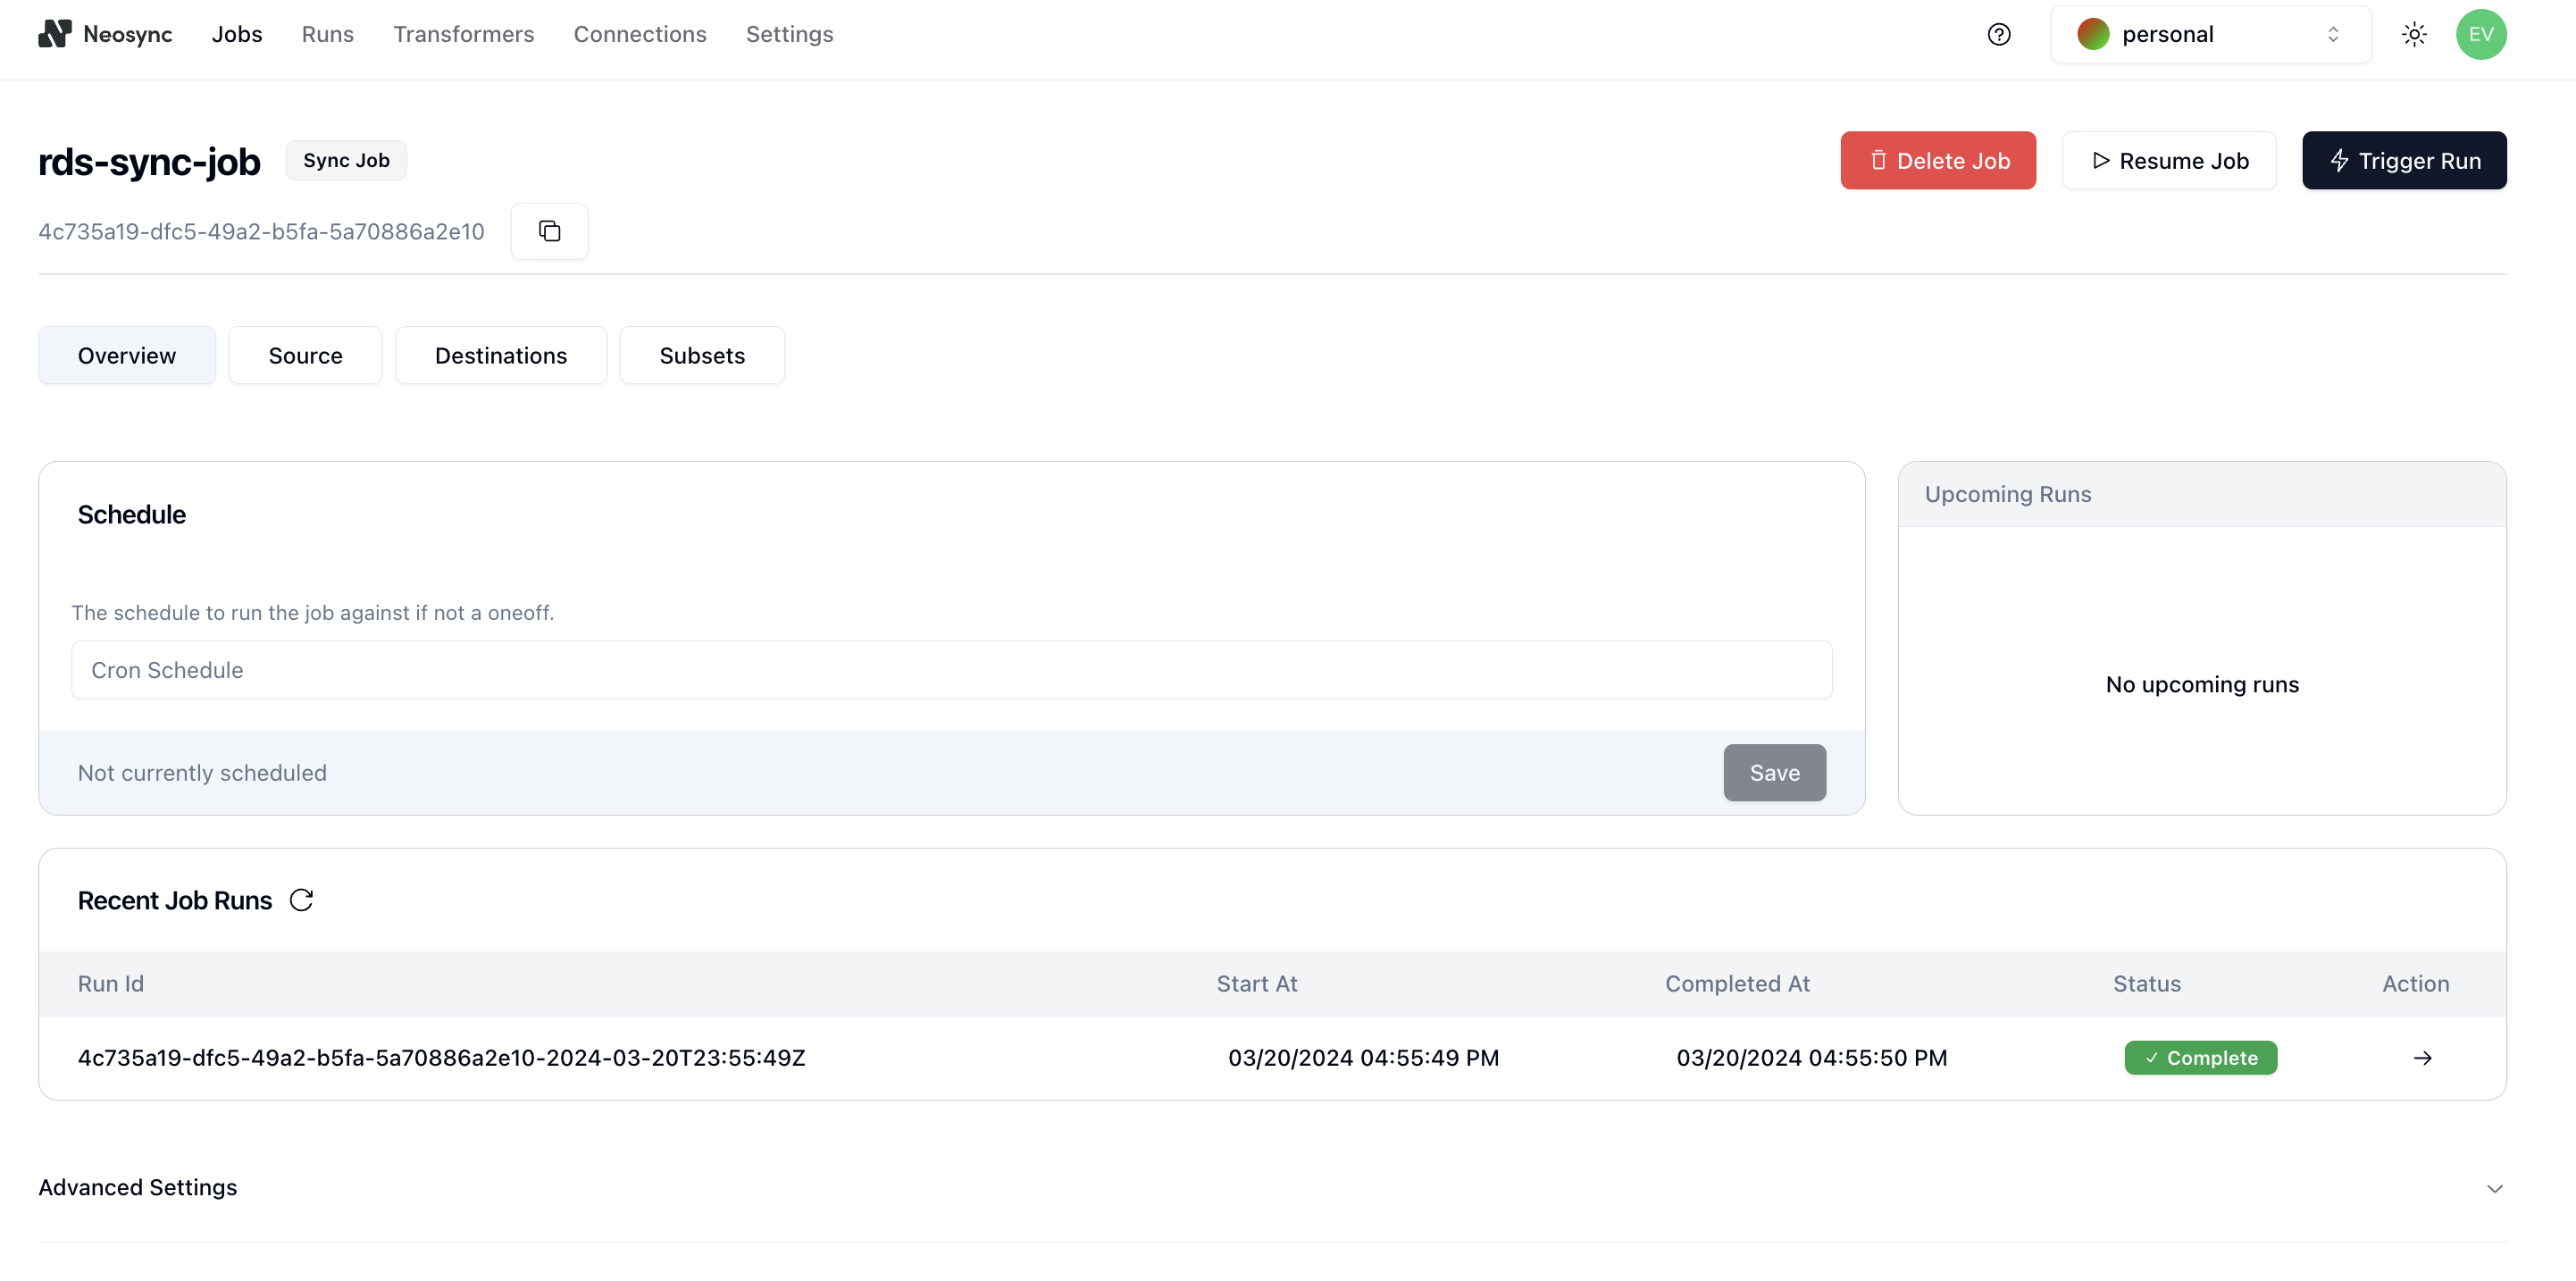
You can see that our job ran successfully and in just 1 second we were able to copy, anonymize and generate data from one RDS database to another.
Now we can head back over to RDS and check on our data. First let's check the users table. We'll want to first ensure that we generated 1000 rows since that's how many were in our source (aws-source) database and then check that the data was anonymized and generated correctly according to our transformers.
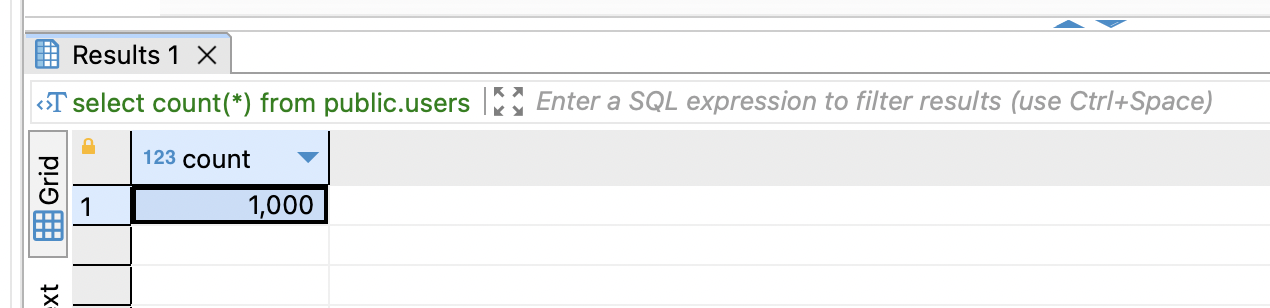
Great, count looks good. Next, let's check the data. Let's take an ID from our source and check it against the destination. Note: remember that relational databases don't guarantee order when selecting data unless you pass an ORDER BY clause so using a SELECT * FROM users query will be misleading. This is our source:
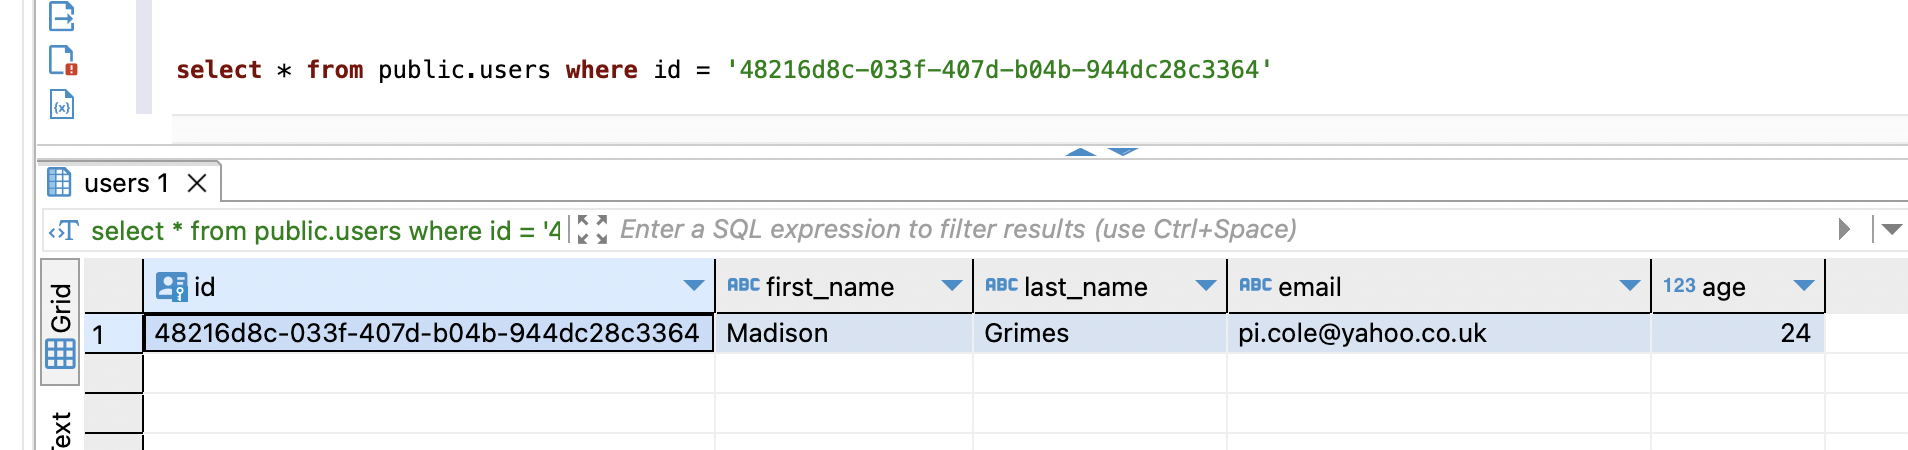
This is our destination:
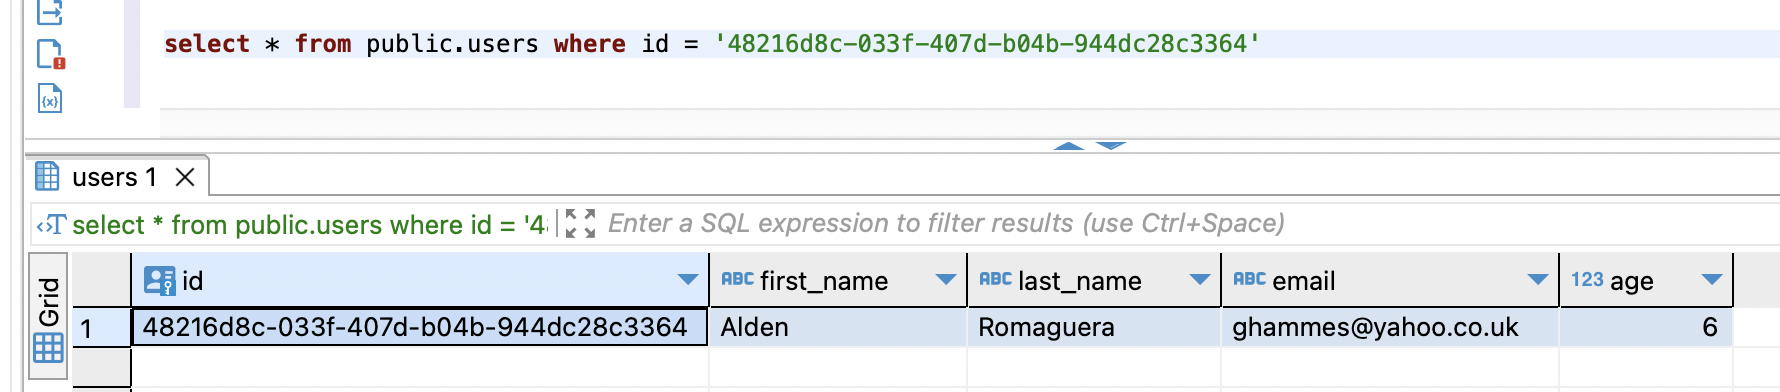
We can see that we generated new first and last names, we anonymized the email address username but preserved the domain and anonymized our age. Nice!
In this guide, we walked through how to anonymize sensitive data and generate synthetic data from one Supabase database to another. The cool thing about this is that it doesn't have to be from one Supabase database to another. Neosync supports any Postgres database. So it can be from Supabase to RDS, RDS to Supabase, RDS to Cloud SQL, etc. This is just a small test and you can expand this to anonymize millions or more rows of data across any relational database. Neosync handles all of the referential integrity. If you're working with sensitive data and want a better way to protect that data, then consider Neosync to take on the heavy lifting.
Top Open Source Alternatives to Tonic AI for Data Anonymization and Synthetic Data
March 31st, 2025

Top 4 Alternatives to Tonic AI for Data Anonymization and Synthetic Data Generation
March 25th, 2025

Nucleus Cloud Corp. 2025