Top Open Source Alternatives to Tonic AI for Data Anonymization and Synthetic Data
Top Open Source Alternatives to Tonic AI for Data Anonymization and Synthetic Data
March 31st, 2025
One of the main benefits of using a container orchestration system like Kubernetes is that you have a lot of control over your deployment strategy and how you deploy software. In a traditional software environment, deployments or upgrades to applications result in downtime and disruption of service which can frustrate users. In today's cloud native world, users expect that software should be available at all times and in all time zones.
Now, thanks to continuous integration and continuous deployment (CI/CD) — a key component of DevOps methodology — deployments aren’t limited to a monthly or quarterly basis. Additionally, with the rise of platform engineering, which is further accelerating the speed at which developers can build and deploy new or improved features, deployments are happening all of the time.
In this blog, we'll walk through three deployment strategies that you can implement to avoid down-time when deploying your software.
Let's jump in.
The three most common types of zero-downtime deployment are:
Lets take a look at all three of these zero-downtime deployment approaches in more detail.

A rolling deployment is the default deployment strategy used in Kubernetes. It updates pods one by one by replacing the existing version of a pod with the new version, without cluster downtime. The update uses a readiness probe to check if the new pod is ready before scaling down the old pods.
Let's look at this process in more detail with an example.
myapp.
Note that this replicaSet defines 3 replicas as the desired state and that the image is set to myapp:1.0.apiVersion: apps/v1
kind: ReplicaSet
metadata:
name: myapp
spec:
replicas: 3
selector:
matchLabels:
app: nucleus-sample-app
template:
metadata:
labels:
app: myapp
spec:
containers:
- name: myapp-container
image: myapp:1.0
# container specs, ports, etc. as neededimage: myapp:2.0.apiVersion: apps/v1
kind: ReplicaSet
metadata:
name: myapp
spec:
replicas: 3
selector:
matchLabels:
app: myapp
template:
metadata:
labels:
app: myapp
spec:
containers:
- name: myapp-container
image: myapp:2.0 # Updated image tag to new version
# Add container specs, ports, etc. as neededimage: myapp:2.0 pods alongside the original image: myapp:1.0 pods.In this way, there is no downtime experienced by the end user because there is always a pod serving their traffic, whether it's the new pod or the old one.
There are two optional parameters that you can define to have more control over the rolling deploy:
The primary benefit of rolling deployments is that if there is an issue during the deployment process, it only affects some of the pods and not all of them and the end user typically doesn't see the impact.

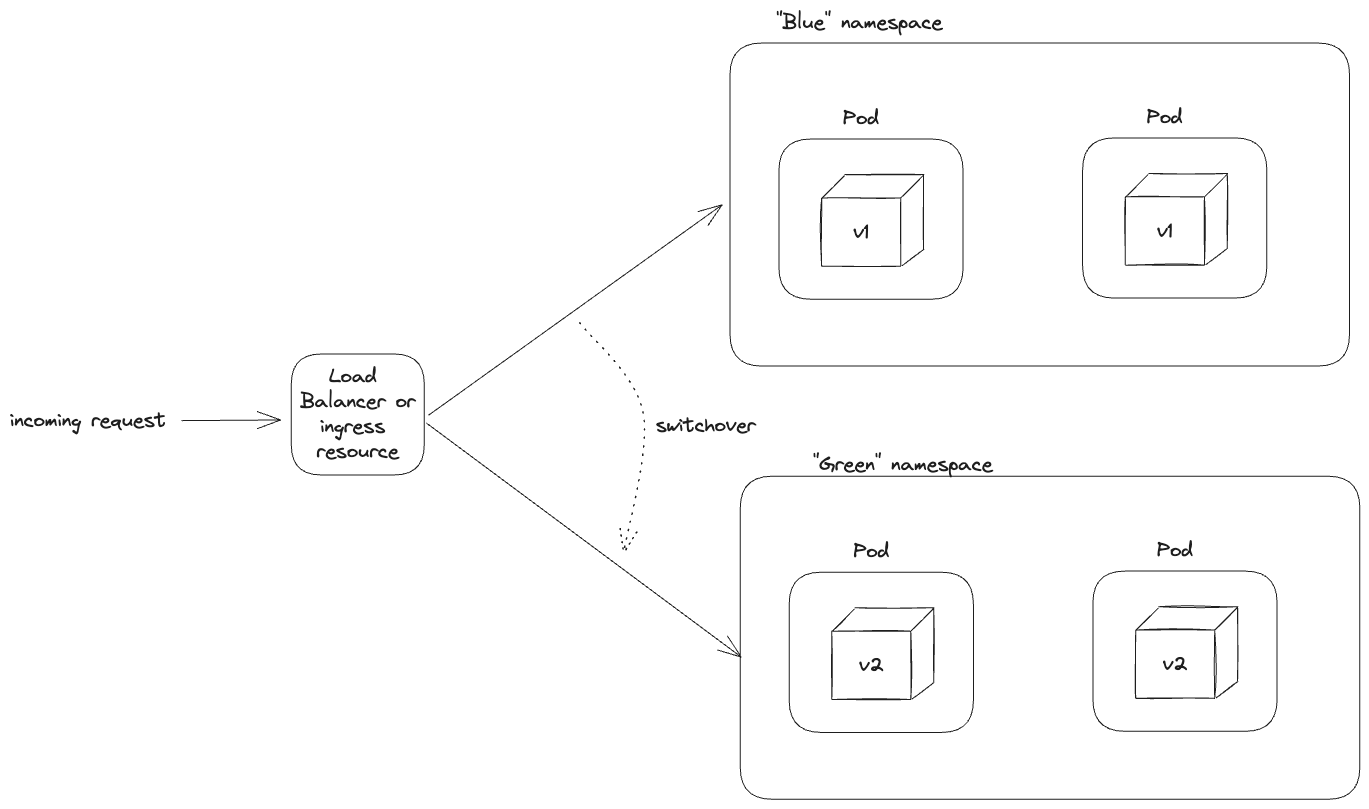
With blue-green deployments, developers maintain two identical environments:
The green environment is tested and validated, and any errors resolved. Once that process is complete, the devOps or platform team will switch over the load balancer or DNS to point to the green environment. This means that incoming requests are then routed from the blue to the green, resulting in the blue becoming inactive. This switchover is fast and has minimal if any downtime on the end user of the application.
In Kubernetes, an environment in a blue-green deployment can be defined at the namespace or even cluster level. With two isolated environments, you can reduce the risk of impacting the live production environment during the update process. And in case anything does go wrong, you can easily switch back over to the blue environment for any rollbacks.
A common question I hear is: how are blue-green deployments different from rolling deployments? Unlike rolling deployments which spin up two different versions of the pods in the same environment, blue-green deployments spin up two completely different environments. This means that rolling deployments happen within the same environment while blue-green happens across environments. From the routing perspective, rolling deployments gradually shift traffic from one pod to another while blue-green deployments switches traffic from one environment to another. Lastly, Kubernetes natively handles the rolling deployments while typically a team manually handles the blue-green deployment. You can automate the blue-green switchover but commonly there is a team monitoring it at the least.
Blue-green deploys are great because there is minimal downtime and an easy way to rollback to a previous working version. However, there are some challenges. The first is resource duplication, as maintaining two identical environments requires additional infrastructure and resources. There is also the challenge of keeping blue and green environments in sync to ensure consistency and avoid unexpected issues during the switchover, while maintaining isolation to prevent interference or unintended data changes between the two environments.
Lastly, while Kubernetes doesn't support blue-green deployments natively (it's default is rolling as discussed above), there are CI/CD platforms such as ArgoCD and Jenkins which can help accomplish this.

Canary deployments are similar to rolling deployments in that an updated application is gradually rolled out (instead of all at once like in a blue-green deploy) but there are couple of important differences.
First is that a rolling deployment happens at the pod level while a canary deployment typically happens at the deployment or service level. Second is that a rolling deploy gradually rolls out the update across all pods with the rate limiting factor being either the maxSurge or maxUnavailable parameter (as discussed above) or how long it takes for a pod to complete the readiness health check. This is typically pretty fast - can be seconds or minutes.
Conversely, a canary deploy rolls out to only a subset of users and is typically manually controlled by the devOps or platform team who assign a weight to the number of requests that should be routed to the updated environment. For example, you may decide that you want 5% of your requests to be routed to the new version of an application while the remaining 95% route to the existing version. Then over time, this can be hours, days or even weeks, you gradually roll out the new version to the rest of your users. The big difference here between canary and rolling deploys is the time-frame and manual nature of the gradual roll out.
Similar to Blue-green deploys, you'll need to use an additional tool to be able to execute canary deploys in Kubernetes. Luckily, there are several tools that you can use from ingress controllers such as Traefik and Nginx to service meshes such as Istio and Linkerd.
Canary deployments are great for early issue detection. Since only a segment of users or servers are exposed to the issue, you can quickly resolve it without jeopardizing the broad user base. Additionally, canary deployments provide an ideal environment for controlled testing and validation. Because you choose the segment, you can experiment with different scenarios to help account for various real-world situations the software may encounter. This also carries some risk, as you may test the software with a non-representative sample.
If you're building applications and services on Kubernetes and thinking about how to achieve zero down-time deploys, then these three options are definitely ones you should consider. Depending on which route you want to go, you may have to use additional tools to achieve those goals but at the end of the day, if you're able to deliver a consistent and stable application to your end users, then it's worth it!
Top Open Source Alternatives to Tonic AI for Data Anonymization and Synthetic Data
March 31st, 2025

Top 4 Alternatives to Tonic AI for Data Anonymization and Synthetic Data Generation
March 25th, 2025
Nucleus Cloud Corp. 2025